Jan 19, 2017

Mint And Yogurt Dip

My final recipe for this week is a dip which we can serve any starter. I used green chillis in this dip if you don't like it too spicy you can add pepper powder in the place of green chillis. Use hung curd for this dip hung curd will give a thick and nice texture to the dip. Serve this dip with paneer tikka or any other starter or even with vegetable slices like cucumber, carrot and beetroot. This will be a perfect choice for salad dressing also.


Let's check the recipe...
INGREDIENTS:---
Yogurt   ----  1 cup
Green chillies  --- 3
Mint leaves  ---  1/2 cup
Garlic ---   4 cloves
Salt to taste
METHOD:---
1. Take mint leaves, green chillies, garlic cloves  add two tab sp. of yogurt and grind in to a fine paste.
2. Take out this mint paste in to a bowl add remaining yogurt and salt to taste mix well.
Leave this dip in the fridge at least for one hour to blend the flavors.
Serve with paneer tikka, alu rolls, cutlets, or simply with masala pappad,,, 
Check out the Blogging Marathon page for the other Blogging Marathoners doing BM#72 

Jan 18, 2017

Vankaya Pachadi

My second recipe under chutney's, spreads and dips is again a chutney from Andhra cuisine. Brinjal/ eggplant/ vankaya Pachadi is one of the all time favorites in Andhra homes. Not only as a chutney eggplant is a favorite vegetable at home. I used green small variety eggplants for this chutney you can use any variety eggplants for this chutney. 


Let's check the recipe
INGREDIENTS:---
Eggplants  --- 5 
Green chillies --- 8 or reduce according to your taste
Coriander seeds  --- 1 tab sp
Cumin seeds  ----  2 tea sp
Urad dal  ---  1 tea sp
Tamarind --- 1 inch piece
Garlic  ---  6 cloves
Oil  --- 1 tab sp
Turmeric powder  ---  1/4 tea sp
Salt to taste
METHOD:----
1. Heat few drops of oil in a pan add coriander seeds, urad dal and fry till golden then add cumin seeds and fry for a while remove and set a side.
2. Wash and wipe the eggplants, cut them in to small cubes.
3. Now heat remaining oil in the same pan add green chillies and fry for a while then add eggplant pieces and fry till eggplant pieces are tender, remove and let them cool.
4. soak tamarind in two tab sp of water.
5. First grind coriander seeds, urad dal and cumin seeds in to a fine powder.
6. Then add fried green chillis and eggplant pieces and run the mixe for two seconds.
7. Add tanarind, turmeric powder, garlic cloves, salt to taste and grind in to a coarse paste.
Remove the vankaya pachadi in to a clean and dry bowl and serve with dosa, idli, pongali or with plain rice and few drops of ghee.
Even I like this as a spread on my toast....
Check out the Blogging Marathon page for the other Blogging Marathoners doing BM#72 


Jan 17, 2017

Pandumirapakaya, Tomato Pachadi

My recipe for this week under chutneys, dips and spreads is a chutney recipe from Andhra cuisine.  Pandu mirapakayalu are fresh ripe red chillies we make a pickle with this red chillies every year in season. December and January is the season for this red chillies and tomatoes. We make pickles with these both vegetables saparately and these two pickles will stay for year. 

We mix this red chillies with Gongura that is called pandu mirapakaya - gongura pachadi, Pandu mirapakaya - tomato pachadi. Pandu mirpakaya tomato pachadi will stay for one month out side, after that can store it in the fridge for six months.

For this Pandu mirapakaya - tomato pachadi always use fully ripe tomatoes so that pickle will get a beautiful red color. I used garlic for tadka, you can use asafoetida in the place of garlic. Red chillies what I get here are really very hot, so i used 150 grams. you can increase the red chilli quantity according to your taste. You can add red chilli powder but that gives a normal tomato pickle taste. I have given 1 cup oil that is more then enough. By next morning the oil you added to the pickle should come up on the top. If you didn't see the oil on top you can heat a tab sp oil again and add it on the top of the pachadi.   


So let's check the recipe....
INGREDIENTS:---
Tomato  ---  250 grams
Ripe redchillies  --- 150 grams
Tamarind  ----  25 grams
Turmeric powder  ---  1/2 tea sp
Fenugreek powder ---  1/4 tea sp
Mustard powder  ----  1 tea sp
Salt  ---  2 tea sp
Oil  ----  1 cup
Mustard seeds ---  1/2 tea sp
Dry red chillies  --- 3 broken
Garlic cloves  ---  8 crushed
METHOD:---
1. Wash and wipe red chillies with a clean kitchen towel and set a side to dry totally. Means there should be no moisture in red chillies.
2. Take red chillies with one tea sp salt and grind in to a fine paste. Make sure you should not any water to this red chilli paste.
3. Wash and wipe the tomatoes, cut them in to four pieces add salt and mix well and leave a side for 10 minutes.
4. After 10 minutes you can find some juice from tomatoes,now add this tomato juice to tamarind and soak tamarind.
5. Now heat 1/2 cup oil in a pan add tomato pieces, keep stiring in between and cook till oil comes out from the sides.
6. Switch off the heat and let the tomato cool down to room temperature.
7. Now take tomato, soaked tamarind with little juice(if require you can add more juice but not water)  and red chilli paste in to a mixer jar and grind in to a fine paste.
8. Take out red chilli and tomato paste from mixer jar in to a bowl. Add fenugreek powder, mustard powder, turmeric power mix well to combine every thing.
9. Heat remaining 1/2 cup oil in a pan add mustard seeds let them popup then add dry red chillies and garlic cloves fry for a while and switch off the heat, let it cool down to room temperature.
10. Add tomato and red chilli paste to the seasoning (tadka) and mix well to combine every thing, Check and adjust with salt.
Store in a clean and airtight bottle..
Serve this Pandumirapakaya, tomato pachadi with dosa, idli, vada. or with hot plain rice with a drop of ghee....

Jan 11, 2017

Macaroni With Vegetables

My next recipe for vegetarian dinner recipes is a pasta which is well known as Macaroni. Macaroni and cheese is a very popular dish with this Macaroni, but my recipe is a bit different then macaroni and cheese. 
                                                                    

Let's check the recipe...
INGREDIENTS:----
Macaroni  ----- 1 cup
Onion --- 1 medium cut in to cubes
Carrot  -- 1 small cut in to 1/2 inch pieces
Broccoli  --- 1/2 cup small flowers
Capsicum  ---  1/4 cup 1/2 in cubes
Baby corn --- 1 cut in ti 1/2 inch pieces
Tomato  --- 1 big finely chopped
Hot and sweet tomato sauce  ---  2 tab sp
Garlic   ----  5 cloves crushed
Cheese  ---  1 cube grated
Oil    ---  1 tab sp
Red chilli flakes ---  1/2 tea sp
Italian mixed herbs --- 1/2 tea sp
Salt to taste.
METHOD:----
1. Boil 4 cups water with a few drops of oil in a pan, bring to full boil and add macaroni to the boiling water and cook till done.
2. drain the hot water and pour cold water over macaroni immediately to prevent sticking together.
Spread macaroni in a plate and set a side.
3. Now heat oil in a pan add crushed garlic fry for a while then add onion give a good stir.
4. After a few seconds add tomato, carrot, baby corn and a pinch of salt sprinkle with a tab sp water cover and cook in a low heat for two minutes.
5. After two minutes remove the lid and add broccoli, capsicum mix well and cook in a medium heat for 5 more minutes in a low flame.
6. Now add red chilli flakes, tomato sauce, Italian herbs miix well and add cooked macaroni, now mix well to combine every thing.
7. sprinkle with grated cheese cover and cook in a low heat for five more minutes and switch off the heat.
Serve hot.....  
Check out the Blogging Marathon page for the other Blogging Marathoners doing BM#72 

Jan 10, 2017

Ragi Carrot Idli


Starting this month second week with some easy to make dinner recipes. Usually I prefer my dinner light like idli, roti, dosa, upma but not rice,I will finish my dinner by 7:30 to 8. These ragi carrot idli's are easy to make and perfect for dinner if you serve with a pickle or chutney. Can serve this ragi idli's with sambar but that will become a bit heavy. If you want to pair this idli with sambar then it will be a perfect and healthy breakfast. 
I have added grated carrot now but you can add finely chipped any vegetables. Like finely chopped cabbage, grated beetroot, green peas, finely chopped french beans. Any vegetables like this or you can add mixed vegetables and make this healthy idlis more interesting.

So let's check the recipe...
INGREDIENTS:---
Ragi flour  ---- 1 cup
Semolina(upma rava) --- 1 cup
Grated carrot  ---  1 cup
Ghee  ---  1 tab sp
Yogurt (curd)  --- 1 cip
Water  ---  3/4 cup
Eno (fruit salt)  ---  1/2 tea sp
Cooking soda  ---  a big pinch
Finaly chopped coriander leaves  --- 1 tab sp for garnishing.
METHOD:---
1. Heat ghee in a pan add semolina and roast it for two to three minutes then add ragi flour, give a good stir and switch off the heat.
2. Add cooking soda to curd mix well and add this curd mixture, grated carrot, salt to taste to semolina and ragi flour and leave a side for two minutes.
3. After two minutes add little by little water and mix well to make a idli batter consistency.
4. In the meanwhile grease idl molds with little ghee or oil and place a little chopped coriander leaves in each mold.
5. Add eno to the batter and mix gently to combine every thing well don't over mix.
6. Pour the ragi carrot idli batter in idli molds and steam cook for 8 to 10 minutes
Serve this healthy ragi carrot idli's with any spicy chutney. I served with tomato chutney
Check out the Blogging Marathon page for the other Blogging Marathoners doing BM#72 

Jan 5, 2017

Kalakand

My final recipe for this week under Milk based sweets is Kalakand. Kalakand is a sweet made with paneer and khoya. As you all know paneer is a cheese made with milk and Kohya is a thick milk solids which is made by boiling the full fat milk. 

For Paneer boil one liter whole milk bring to full boil, reduce the heat add little by little 1/2 cup fresh curd keep stirring.
After few seconds milk will curdle switch off the heat and strain the whey water and collect paneer in a cheese cloth, This one liter milk gives you nearly one and half cup paneer. Rinse the paneer in cold water well and set a side, rinsing the paneer in cold water makes paneer little more soft. Now close the cheese cloth from all sides tie a not and tie this on a height for half an hour to remove extra water. we need one cup paneer from this to prepare kalakand.


We need one and half cup kohya (un sweetend kova) for this kalakand recipe. Heat one liter milk in a thick bottom pan bring to full boil and reduce the heat and keep boiling the milk. Boil the milk till it turn in to thick and grainy after one and half hours or two hours the milk turn in to a solid with a grainy texture and starts leaving the sides of the pan. This is kohya which we are going to use for making kalakand.

Always use freshly made paneer and kohya for making Kalakand. This is a milk based sweet so it has a less life time it will stay for two to three days in room temperature. Can store this in fridge for one week.
                                                                             

Now let's check how to make Kalakand...
INGREDIENTS:---
Kohya (un sweetend kova)  ---  1 1/2 cups
Paneer  ---  1 cup
Sugar -- 1/2 cup powdered
Ghee  --- 2 tab sp
Cardamom powder  ----  1/2 tea sp
Finely chopped almonds and pistachios -- 2 tab sp
METHOD:----
1. Crumble the paneer and kova in a nonstick pan and start heating. It will turn soft after few minutes. Keep stirring and cook for 15 minutes.
2. Now add ghee, powdered sugar, cardamom powder mix well to combine every thing. Keep stirring and cook till it leaves the sides of the pan it will take 15 minutes in a medium heat.
3. Finally add one more tab sp ghee and chopped nuts mix well and pour this in to a greased pan.
Flaten the surface with a greased laddle leave a side to cool down to room temperature, it will take one hour time to cool down.
Cut in to squares, you can garnish with chopped nuts and silver vark.
 Check out the Blogging Marathon page for the other Blogging Marathoners doing BM#72 
  

Jan 4, 2017

Basundi

Basundi is a milk based sweet which is very popular in three states, Gujarat, Maharastra and Karnataka.I have always confused with Basundi and rabri . Some people says both are same, some says both are different. After trying these two recipes and a small research I came to know both recipes are almost same with little variations.  
  1. Both rabri  and Basundi are made with full cream milk.
   2. The consistency of rabri is more thicker then Basundi
   3. For rabri you have to keep on scraping the layer which form on the top and sides which is a fat layer this gives the rabri a granules type of texture.
4. Rabri is served with Malpua or jelabi since Basundi is served as it self as a dessert.
                                                   

Make sure to use a thick bottom pan. Once you get a full boil reduce the heat and cook on a low heat and remember to keep scraping the sides of the pan while cooking. This gives the Basundi a creamy and rich texture.
                                                         Basundi will be served as a dessert chilled or warm. Also served with puri and sabji as a part of festival meal specially for Holi, Dessara, uttarayan like festivals. In north Karnataka Basundi is served as side dish with puris.  
                                                                 
 
INGREDIENTS:---
Milk  ---  1 and half lit. full cream milk
Sugar  ---  3/4 cup
Cardamom powder ---  1 tea sp
Almonds  ----  15 finely chopped
Pistachio  --- 15 finely chopped
Saffron  --- few strings
METHOD:---
1. Start boiling one and half lit. full cream milk in a thick bottom pan
2. Bring to a full boil and reduce the heat to low and boil till milk reduced to half it will take approximately one hour or more.
                                                         

3. In between keep stirring and scraping the pan and keep boiling
4. Now add sugar and cook for 20 minutes more to bring the consistency. Because when you add sugar the consistency will turn in to thin.
5. Add cardamom powder and chopped almonds and pistachios and cook for 20 more minutes in a very low heat.
Switch off the heat and garnish with chopped almonds, pistachios and saffron strings and serve warm or chilled


Jan 3, 2017

Semiya Payasam

Starting this New year with a sweet dish. When I made semiya payasam with tomato rice for make a meal theme last month, I realized that I didn't posted a recipe for Semiya payasam till now.How surprising which I make very often that sweet recipe is not in my blog. Then I thought of posting semiya payasam recipe with a small twist.
                                                                  I have added roasted poppy seeds and almond paste and condensed milk to the semiya payasam to make it more flavor full and rich. Actually we don't add this poppy seeds and almond paste to the payasam. We just cook the semiya in milk and add sugar, cashews and raisins. But this poppy seeds and almond paste will give a delicious flavor to the semiya payasam. This Semiya Payasam is for my this month first week theme Milk Based Sweets.
                                                                              

So let's check the recipe....   
INGREDIENTS:----
 Semiya (vermicelli) --- 1/2 cup
Milk  -----  500 ml
Sugar  ---  1/4 cup
Condensed milk  ---  1/4 cup
Cashew nuts  --- 10 broken
Raisins  ---  15
Almonds ---  5 soaked in warm water for 10 minutes
Poppy seeds  ---  1 tea sp
Cardamom powder  ---  1/2 tea sp
Ghee  ---  1 tab sp
                                                                     

METHOD:---
1. Heat a pan and dry road poppy seeds for few seconds remove and set a side.
2. De-skin the soaked almonds add poppy seeds add little water make coarse paste and set a side.
3. Heat ghee in a pan add cashews fry till golden remove, fry raisins in the ghee remove and set a side.
4. Now add semiya to the same ghee fry till light golden, then add milk to the semiya mix well and let it cook till done it will take five minutes.
5. Add poppy seed and almond past, condensed milk mix well cook for two more minutes.
6. Add sugar mix well let it cook for few more minutes and switch off the heat, add fried cashew nuts and raisins mix well
Serve hot or chilled.. 
 Check out the Blogging Marathon page for the other Blogging Marathoners doing BM#72

Dec 26, 2016

Molake Kalu Saru

My final recipe for this week even for this year. I was not much active here this year because of my health and personal issues. Hope fully will be more active next year. So my final recipe is a side dish from Karnataka cuisine. This gravy is a good choice for plain rice and chapati. I made this gravy with black channa sprouts and moong sprouts you can add as many sprouts you like. Like you can make this with mixed sprouts or even with only one variety of sprouts. If you don't have sprouts can make this gravy with soaked pulces.
                                                                         

So lets check the recipe.....  
INGREDIENTS:---
Black channa sprouts --- 1/2 cup
Whole moong sprouts  --- 1/2 cup
Egg plant  --- 3 small cut in to 4
Potato   --- 1 big cut in to cubes
Onion ---  1 medium finely chopped
Oil  ---  2 tab sp
Mustard seeds  --- 1/4 tea sp
Cumin seeds  --- 1/4 tea sp
Red chilli powder  --- 1 tea sp
Turmeric powder  --- 1/4 tea sp
Salt to taste
Fresh coriander leaves  ---  1 tab sp
                                                                          

FOR MASALA:---
Grated fresh coconut  ---  1/2 cup
Ginger  ---  1 inch piece
Garlic  --- 10 cloves
Coriander powder  --- 1/2 tab sp
Cinnamon  ---- 1 inch piece
Cloves ---  4
Onion  ---  1 big cut in slices
Tomato  ---  1 big cut in to cubes
                                                                 

METHOD:---
1. Heat oil in a pan add onion slices till translucent remove from heat add grated coconut and other ingredients given for masala, add little water grind in to a fine paste.
2. Heat oil in a pressure cooker add mustard seeds let them popup then add cumin seeds fry for a while and add chopped onion fry till onion turn in to pink.
3. Now add sprouts, potato cubes, red chilli powder, turmeric powder, ground masala mix wll and cook till oil leaves from the sides.
4. Add eggplant pieces, salt to taste mix well and add two cups of water give a good stir, close the cooker with lid and cook till 4 whistles.
Serve hot with rice or roti...
Check out the Blogging Marathon page for the other Blogging Marathoners doing BM#71 

Dec 25, 2016

Chilli Paneer

My second recipe for Make a meal theme is a side dish. This is a side dish you can serve with rice or noodles. You can make this chilli paneer with gravy or you can make it as a dry dish both will work as a side dish. Is there any original recipe for this chilli paneer I didn't check. But there are many versions for this recipe, I think it's a fusion recipe and I gave few my own touches to the recipe.  I made fried rice with fresh green garlic with this Chilli paneer to make it a meal.
INGREDIENTS:---
Paneer  ---  250 grams
Capsicum  ---  2 big cut in to cubes
Ginger  ---  1 inch piece chopped
Green chillies  ---  5 finely chopped
Spring onion --- 1 cup chopped
Onion  ---  1 big cut in to cubes
Corn flour  ---  1/4 cup
All purpose flour (maida)  ----  2 tab sp
Pepper powder  ---  1/2 tea sp
Ginger and green chilli paste  ---  1 tea sp
Sweet chilli sauce  --- 1 tab sp
Hot and sweet tomato sauce  ---  1 tab sp
Oil for frying paneer pieces
METHOD:----
1. Cut paneer in to one inch long cubes sprinkle pepper powder, a pinch of salt 1/4 tea sp of ginger and green chilli paste mix well to coat the spices.
2. Add corn flour and 1 tab sp all purpose flour sprinkle little water mix well and set a side.


3. Spread remaining all purpose flour in a plate, take paneer pieces and roll them on dry flour and set a side.
4. Heat oil in a deep frying pan and slowly drop paneer pieces in to the hot oil and fry till golden in a medium heat. Don't fry paneer pieces for long time paneer will turn hard. Remove from oil set a side.
5. Heat oil in a pan add chopped ginger and green chilli fry for a while in a high heat.
6. Add onion and capsicum cubes give a good stir, add 1/2 chopped spring onion mix well.
7. Now add ginger and green chilli paste, sweet chilli sauce, hot and sweet tomato sauce quickly give a good stir.
8. Add fried paneer pieces quickly give a good stir, mix well to combine every thing.
Remove from fire sprinkle with remaining chopped spring onion and serve with fried rice or noodles.
If you want to make this with gravy then mix one tea sp corn flour in 1/2 cup water and add this corn flour water at the end mix well and remove from fire.
Check out the Blogging Marathon page for the other Blogging Marathoners doing BM#71 

Dec 24, 2016

Tomato Rice

Tomato rice is one of my all time favorites. I can finish my lunch with tomato rice and a salad or raita,but hubby heats this combination. I have tried  a few varieties of tomato rice, this one is a bit different then those recipes. May be because of that red chilli and coriander powder. This is my first recipe for this week under Make a meal theme. 


In this meal I served tomato rice with
Curd rice,
Semiya payasam,
Beetroot and sprouts stir fry (will post soon)
Vankaya pachadi (will post soon)
Pappad 
You can serve this tomato rice with cucumber raita and simple potatao fry to make the meal even more simple. You can just enjoy tomato rice with raita that's your choice..
My other tomato rice recipe
Tomato Biriyani recipe


Let's check the recipe....
INGREDIENTS:---
Rice  ----  1 cup (basmathi rice)
Tomatoes  --- 2 medium size
Ginger  --- 1/2 inch piece
Garlic  ---  5 cloves
Onion  --- 1 medium finely chopped
Red chillies  --- 3
Coriander seeds  --- 1 tea sp
Cumin seeds  --  1/2 tea sp
Oil  ----  1 tea sp
Butter  --- 2 tea sp
Cinnamon --- 1 inch piece
Cloves  --- 4
Bay leaf  --- 1
Star anise --- 1
Cashew nuts --- 6
Raisins  ---  6
Salt to taste
                                                                              

METHOD:---
1. Add two cups of water, cardamom, cinnamon,cloves, star anise to rice,cook till done and spread on a plate to cool.
2. Chop tomatoes and sprinkle with little salt and cook till soft, set a side to cool.
3. In a pan dry roast red chillies, coriander seeds, cumin seeds till golden, remove and grind in to a coarse powder and set a side.
4. Now add ginger and garlic to the cooked tomatoes and grind in to a smooth paste.
5. Heat oil and butter in a pan add cashews and raisins fry till golden remove and set a side.
6. Now add chopped onion to the same oil, butter mixture fry till golden then add tomato paste and cook till the tomato past become thick and oil comes out from the sides.
7. Add rice to the tomato mixture, sprinkle salt to taste, red chilli coriander and cumin powder and give a good stir .
8. Add golden fried cashews and raisins to the tomato rice mix well to combine everyting
Serve hot with any raita or with curd rice and vegetable stir fry, pappad.
Check out the Blogging Marathon page for the other Blogging Marathoners doing BM#71 

Dec 10, 2016

Tawa Paneer Tikka

Paneer Tikka is a vegetarian alternate to meat tandoor snacks. Tikka is a dish which is cooked on a tandoor, but you can always make a tikka recipe on stove top. I tried to make it in my OTG but some how I felt the paneer was not properly cooked and didn't get that smokey flavor. When I tried it on tawa that taste almost like the tandoori tikka, of course not a perfect tandoor flavor but you can enjoy the paneer tikkas at home.  


I am not a big fan of paneer may be because of it's bland taste. But like this spicy dishes I can enjoy any time. This paneer tikka recipe is a different one then other recipes. I made the marinate according to our taste. I used red chilli, ginger garlic paste, soak dry red chillies and grind with ginger and garlic to give fresh and spicy flavor. If you felt that it will be spicy then avoid dry red chillies and add just ginger garlic paste and a half  tea sp of red chilli powder or you can avoid red chilli powder also and add only ginger garlic paste. Any way we are going to add green chutney, there will be green chillis in green chutney that spice will give a mild spicy flavor to your tikka.

I made a mint raita to go with this tikka, grind 1 cup of mint leaves, 1/4 cup of coriander leaves, few garlic cloves and two green chillis in to a coarse paste add salt to taste and mix with yogurt. this mint raita will be a good combination with any tikka, stuffed parathas, tikkis and you can serve this raita just with a masala papad.
So now lets check the recipe.........
INGREDIENTS:---
Paneer  ---  250 grams
Capsicum  ----  2 big
Tomato  ---  2 big
Onion   ---  1 big
Green chutney  ---  2 tab sp
Ginger, garlic, red chilli paste  ---  1 tab sp
Curd  ---- 1/2 cup
Salt to taste
Chat masala  ---  1 tea sp 
METHOD:----
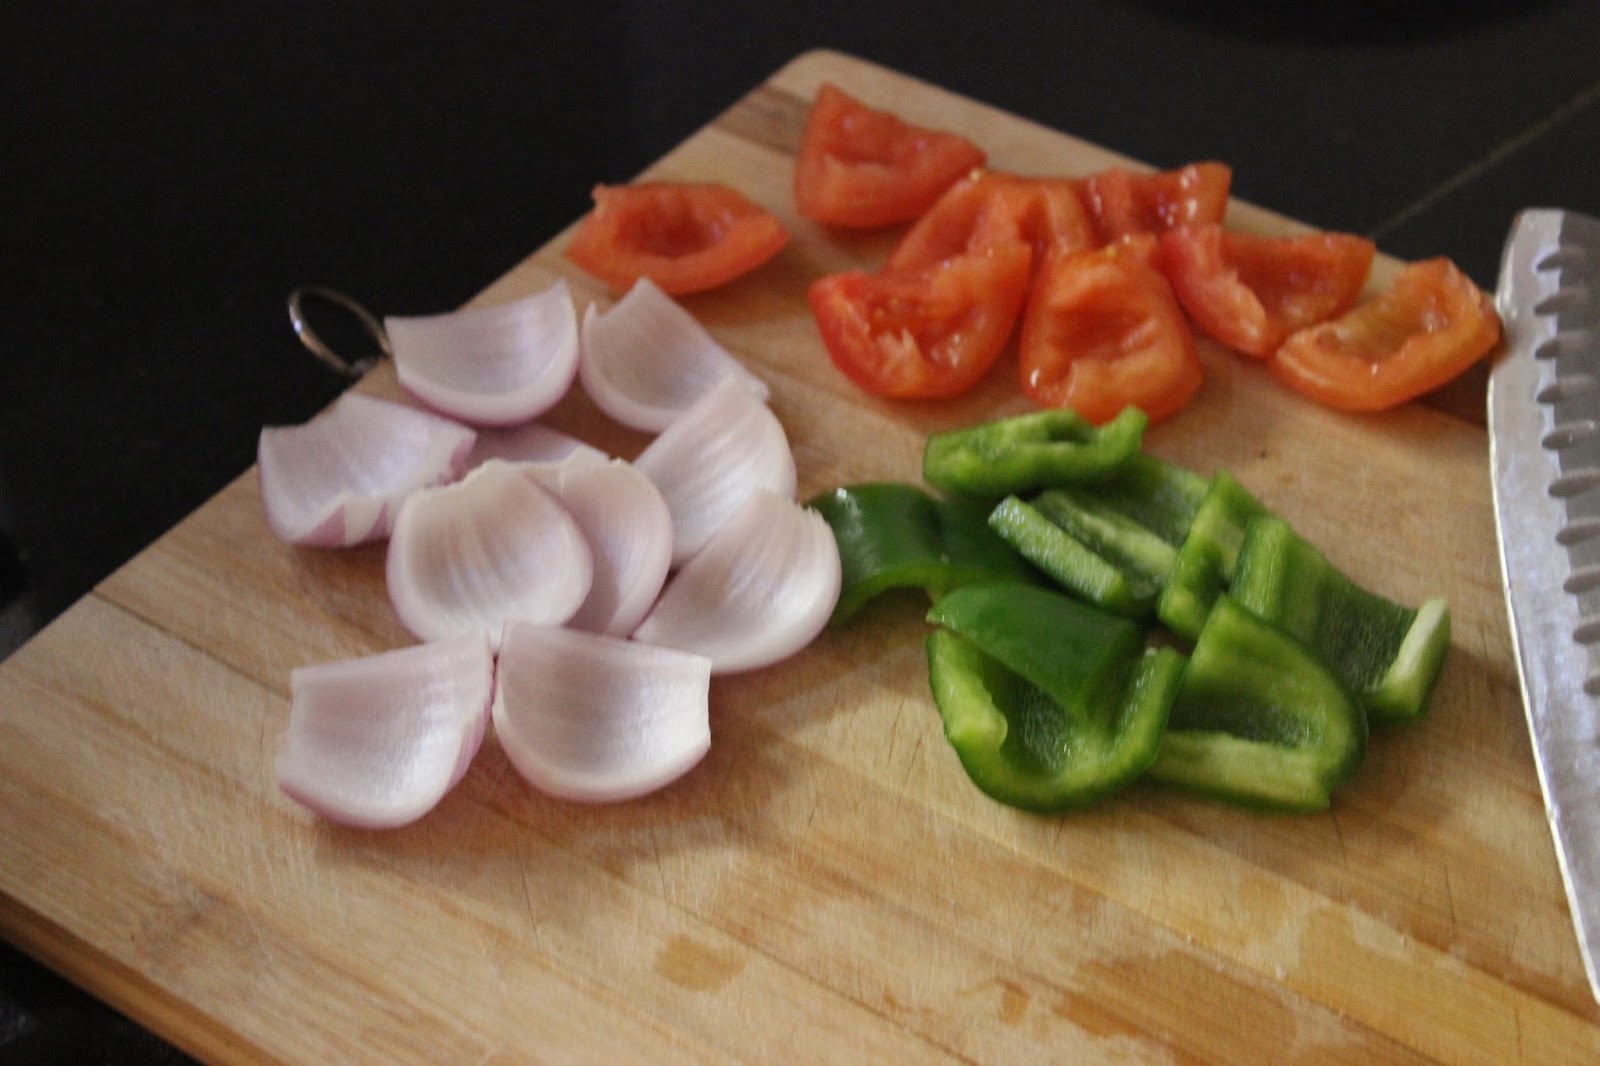
1. Cut paneer in to cubes, cut capsicum, tomato and onion in to cubes.
2. Whisk curd till smooth and add green chutney, ginger, garlic, red chilli paste, chat masala, salt to taste mix well.
3. Add paneer cubes to the curd mixture mix well to marinate the paneer pieces,set a side at least for half an hour (if possible leave this marinated paneer pieces in fridge for over night).
4. Heat a tawa sprinkle little oil, take paneer pieces from the marination and place them on the tawa and roast both side till golden.
5. In the mean while add tomato, capsicum and onion pieces to the left over marination mix well to coat.
6. Place the marinated vegetable pieces on the tawa and roast both sides.
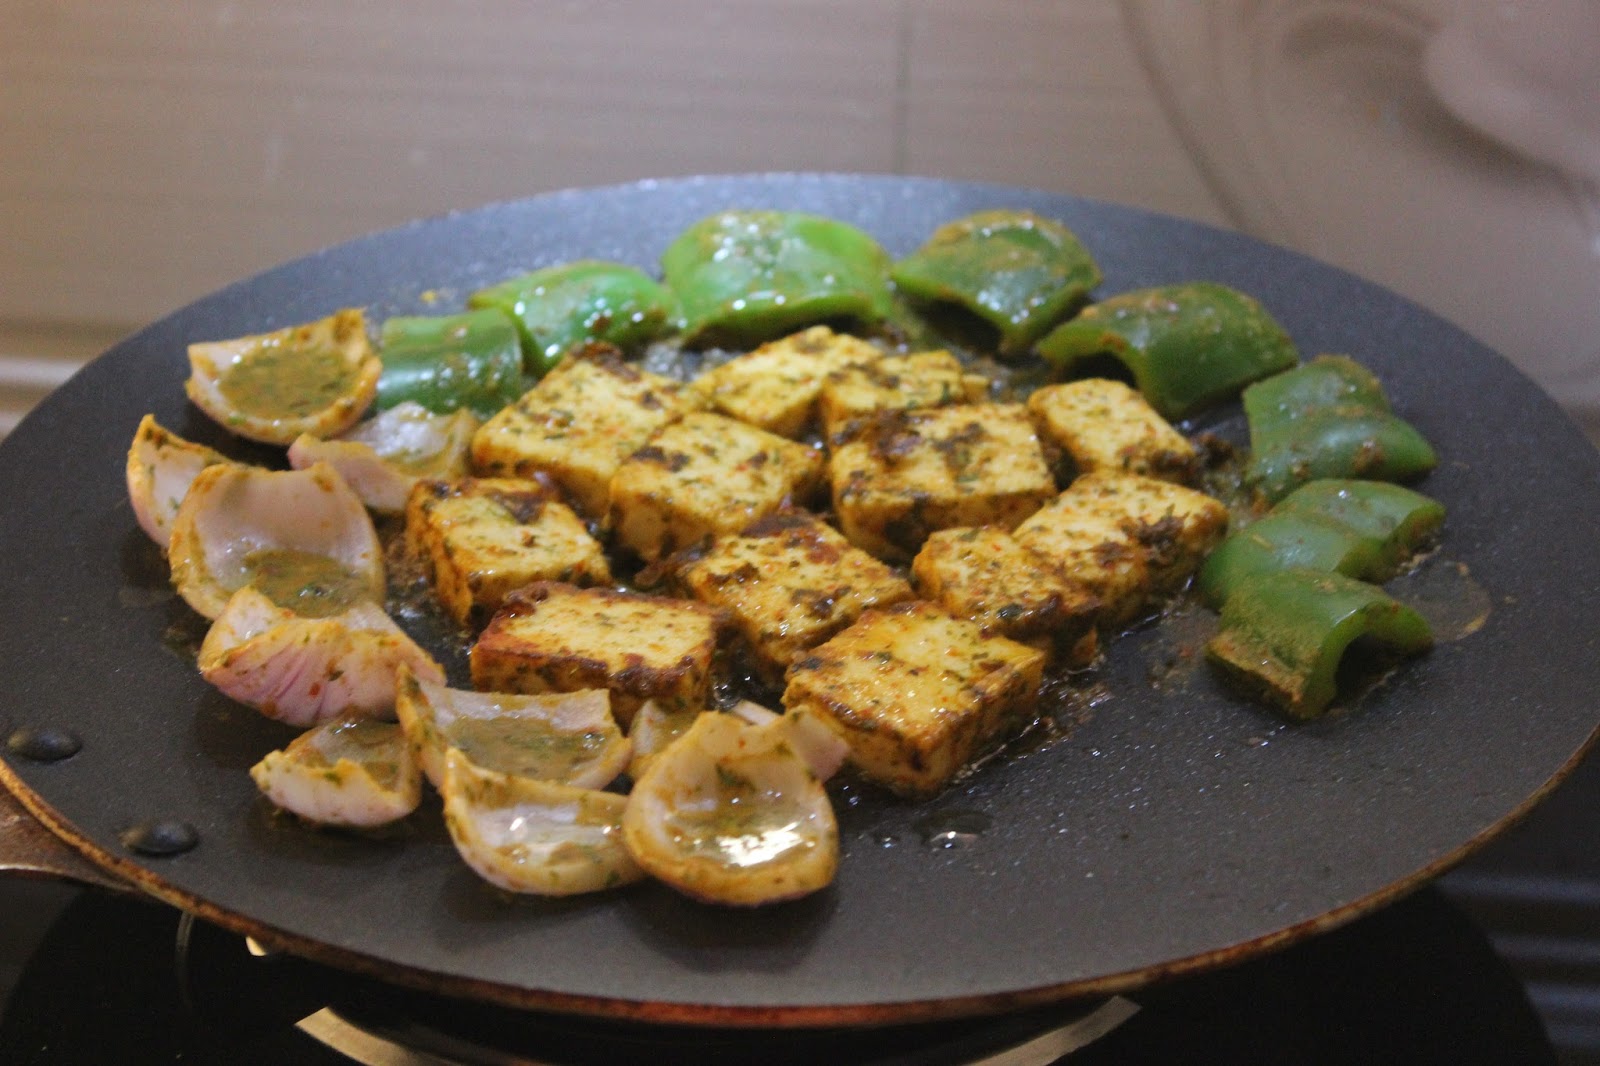
7. Remove the paneer and vegetable pieces from the pan and arrange them on a satay stick and again place them on a hot tawa, sprinkle little oil on top and cook on a medium heat all sides till golden.
Serve with mint raita or green chutney....  

Add paneer cubes to the curd mixture mix well to marinate the paneer pieces,

add tomato, capsicum and onion pieces to the left over marination mix well to coat.


Heat a tawa sprinkle little oil, take paneer pieces from the marination and place them on the tawa and roast both side till golden.


Place the marinated vegetable pieces on the tawa and roast both sides.


Arrange paneer and vegetable pieces one by one on a satay stick and again place them on a hot tawa, sprinkle little oil on top and cook on a medium heat all sides till golden.
Serve with mint raita or green chutney and salad..
Check out the Blogging Marathon page for the other Blogging Marathoners doing BM#71

Nov 10, 2016

Raw Banana Tawa Fry (Aritikaya chops)

Another edition of Blogging Marathon this is 70th edition. We few bloggers doing this Marathon almost from five year and we reached this mile stone. Now we become like a good family and I am very happy to be in this family. Thanks to Sri Valli for this beautiful family.
                                                                Like every month this month also we have some themes my theme for this week is Tawa fried recipe. Actually I was suppose to start my themes from first week but could't do because of health reasons. So I have started my posts from second week with tawa recipes.
                                                                When I have selected this theme the first recipe came to my mind is this tawa frided vegetables. My mother use to make this chops as a side dish with pappucharu or tomato pappu or dosakaya pappu this is the perfect combination. For today recipe I used raw banana other then this you can make this chops with potato, yam and eggplant, ridge gourd. when you are using eggplant or ridge gourd no need to boil the vegetable before you fry them on tawa
                                                      I used red chilli paste for this recipe for red chilli paste soak few dry red chillies in warm water remove from water add a table spoon water and grind in to a smooth paste. In the place of this red chilli paste you can add red chilli powder that will give a different flavor That's totallr your choice.


So let's check the recipe.....
INGREDIENTS:---
Raw banana ---  1 
Red chilli paste ---  1 tea sp
Ginger garlic paste -- 1 tea sp
Turmeric powder ---  1/4 tea sp
Gram flour ---   1 tab sp
Fine samolina ---  1 tab sp
Salt to taste
Oil for frying
                                                                          

METHOD:---
1. Peal and slice raw banana in to thin long pieces. Place them in a pan and cover with water, add a big pinch of salt and a pinch of turmeric powder, cover with a lid and cook till banana pieces are half cooked.
2. Drain the water and spread banana pieces on a kitchen towel to remove the extra moister.
3. Mix red chilli paste, ginger garlic paste, a pinch of turmeric powder, salt, gram flour add a tea sp of water mix well to make a paste.
4. Spread this red chilli paste on boiled banana pieces eveny
5. Roll this spiced banana pieces in fine samolina and set a side.
6. Heat a tawa and sprinkle little oil and place banana pieces on it and fry till golden.
Serve with dal and rice or you can serve this banana chops as a starter.


Oct 26, 2016

Goru Meetilu or Goru Mitai

My final recipe for this week under Indian Sweets is again a traditional sweet from Andhra cuisine. Goru Meetilu is a traditional sweet which specially made for deepavali in some regions of Andhra Pradesh. The name Goru meetilu is because we give shape for this sweet with our thumb finger nail, goru means nail in Telugu. We are giving the shape with thumb finger nail and dipping them in the sugar syrup to make them sweet. Meeti or mitai means sweet ,actually meeti is not  a Telugu word I don't know how they adopted. Will do a bit investigation on that.
The main ingredients for this recipe is maida, rava, and sugar. Here in this recipe I used chiroti rava whis is fine upma rava. You can use normal upma rava also. The original recipe calls for upma rava because we don't get chiroti rava in Andhra Pradesh.
Next ingredient is sugar in some homes they mix half sugar and half jaggery or only with jaggery. But some how my choice is sugar so choosing the sweetener is your choice.
You can use whole wheat flour in stead of maida or you can mix half maida and half wheat flour. only thing if you use wheat flour you get a little dark color.
Now let's check the recipe.
   
INGREDIENTS:---
Maida (all purpose flour)  ---  200 grams
Chiroti rava or upma rava  ---  3 tab sp
Soda- bi- carb --  a big pinch
Salt   ---  a big pinch
Ghee  ---  50 grams melted
Sugar  ---  150 grams
Cardamom powder  --- 1 tab sp
Ghee  ---  1 tea sp
Milk --- 1/2 cup
Water  ---  1/2 cup
Oil for deep frying

METHOD:---
1. In a mixing bowl take maida, rava, soda-bi-carb, salt,  ghee and rub with your fingers to give a crumb texture to the flour.
2. Add half cup milk and half cup water to the flour mixture and knead in to a stiff dough. Knead this dough for five minutes, cover with a cloth and set a side for half an hour.
3. Now make small balls out of this dough and roll them in to a finger shape.
4. Press the dough fingers in the center, now take the dough finger in between your index finger and middle finger and press with your thumb finger to make impression by this time you get a shape on the top leave a small gap and do the same to give goru meeti shape,

5. Do the process with all the dough and set a side.
6. Heat oil in a deep frying pan and  keep the heat in low and drop this goru meetilu slowly one by one in to the hot oil.
7. Fry goru meetilu in a low heat till golden, remove from oil and set a side.
FOR SYRUP:----
8. In a thick bottom pan take sugar add 1/2 cup water mix well till sugar dissolves in water.
9. Cook this sugar water in a medium heat till you get a two thread consistence, add ghee and cardamam powder mix well and add fried goru meetilu and mix well to coat the sugar syrup all over the goru meetilu.
10. Mix well and remove the gori meetilu from sugar syrup and spread them on a plate and let them cool.
Store Goru meetilu in a air tight container.
Goru meetilu will stay for a month. 
                                                                               
make small balls out of this dough and roll them in to a finger shape.

Press the dough fingers in the center


now take the dough finger in between your index finger and middle finger and press with your thumb finger to make impression

by this time you get a shape on the top
leave a small gap and do the same to give goru meeti shape,
Do the process with all the dough and set a side.
Heat oil in a deep frying pan and  keep the heat in low and drop this goru meetilu slowly one by one in to the hot oil.
Fry goru meetilu in a low heat till golden, remove from oil and set a side.
Now make the sugar syrup as I said in the recipe method above and fold the Goru meetilu in the sugar syrup to coat well.

Oct 25, 2016

Bellam Boondi or Boondi Mitai

Now coming to the second sweet under my Indian Sweets theme this is my childhood favorite. A typical andhra sweet which is made with besan and jaggery . Bellam Boondi or Boondi achu or Boondi mitai is the names for this sweet.freshly made boondi folded in to thick jaggery syrup then poured in to greased plate then cut in to desired shapes or you can make in to small balls but you have to give the ball shape when it is hot other wise the sweet boondi will get dry.
                                                                         

                                                                      Making the boondi is a bit different for this sweet, not like boondi laddu. Fry boondi in to golden color then only the boondi will stay crisp. So the first point is use coarsely ground gram flour for this boondi. Finely ground gram flour will give a soft texture to boondi. Second point is add half portion rice flour to besan means if you took 1 cup besan then add half cup rice flour, so that boondi will turn crisp and stay crisp for long time.


 For this recipe we have to make three thread or hard ball consistency syrup with jaggery. If you want a detail recipe please check my recipe for jaggery syrup   
                                                                       Be careful with the syrup if you made a two thread consistency then the boondi mitai won't stay crisp and the boondi will go soggy. So be patience when start making the syrup and don't leave the syrup on the stove. This Bellam boondi or Boondi mitai will stay for long means it will stay for a month at least. So try to make this for this Deepavali
                                                                       

Let's check the recipe...
INGREDIENTS:---
Gram flour (besan, Senaga pindi) ---  3 cups
Rice flour ----  1 and half cup
Cooking soda ---   a big pinch
Ghee  ---  1 tab sp
Salt - --- a big pinch
Water  ---  2 cups approximately ( it may take less water so check and add water)
FOR JAGGERY SYRUP:--
Grated jaggery ----  4 cups
Cardamom powder  ---  1 tea sp
Ghee  ---  2 tab sp
                                                                         

METHOD:---
1. Take a mixing bowl add besan, rice flour, soda mix well with your hand to combine well.
2. Add little by little water and mix in to a thick batter this batter should be like a thick dosa batter.
So check and add little by little water if the batter turn in to a thin consistency the boondi will drink oil.
3. Add ghee to the batter mix well this will give boondi a nice aroma.
4. Now heat oil in a deep frying pan in a high flame. To check the if oil is hot enough, drop few drops of batter with a spoon, if the drops came up immediately then the oil is ready to make boondi.
 So heat of the oil is most important, if the oil is hot enough then you get perfect bubbles of boondi.
And one more thing if the oil is hot enough when you drop batter in to the oil  the boondis will come up immediately other Wise the batter will sit in the bottom of the oil and they stick together and you do not get perfect boondi. So heating of the oil is most important.
The second point is if you over heat the oil then your boondi will come up very fast and they turn red very fast and do not cook properly . 
5.  Hold a skimming ladle (one with holes normally we use to remove deep frying) above the hot oil and pour a soup ladle full batter  so that the batter will drop in to the hot oil trough the holes.
With in few seconds you can see the boondi coming up in the hot oil.
                                                              
6. Fry this boondi till golden, remove and place them in a strainer to remove extra oil if any.
Prepare boondi with all the batter and set aside.
NOW START MAKING THE SYRUP:-
7. Take grated jaggery in to a thick bottom pan, add 1/4 cup water let the jaggery melt.
8. Remove the jaggery from fire and strain to remove the dirt if any.
9. Bring back the jaggery water to the same thick bottom pan and cook till you get a three string syrup.
Keep a plate with water in the side and drop few drops of jaggery syrup in the water if you bring to gether the the syrup which is in the water that should form like a ball.
Then the syrup is ready.
10. Now add ghee and cardamom powder to the syrup mix well, reduce the flame.
11. Pour the prepared boondi in to the jaggery syrup give a good stir and switch off the heat
12. Mix boondi with jaggery syrup well to coat the syrup all over the boondis 
13. In the mean while grease a plate with ghee and pour the jaggery coated boondi in to the greased plate, spread it evenly (this job you have to do very fast other wise then boondi will become hard and you can not give it a nice shape.)
Now take a big knife and make marks to break the boondi mitai in to desire shapes.
Set a side to set, when the mitai is set break it in to desire shapes, remove from the plate and store it in a air tight container.